Tampilkan postingan dengan label MUA. Tampilkan semua postingan

Senin, 21 April 2014

Urban Decay Electric Palette Look #2!

Hey guys,
I am having so much fun with the Urban Decay Electric Palette! I can't get over how pigmented and flawless the pigments are.
I know I've only just put a look out but it took me soo long to do I didn't want to wait around any longer for another!
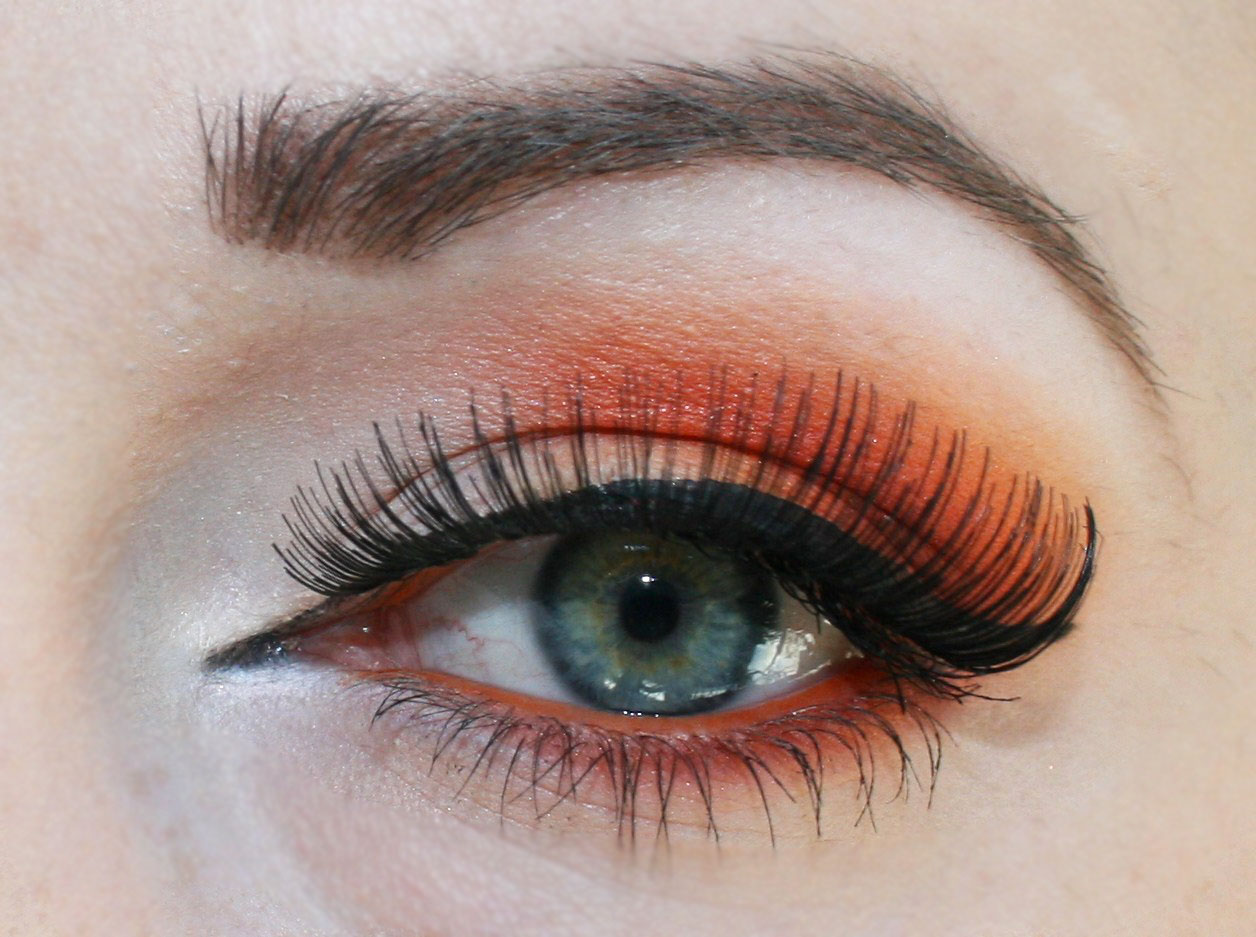
I am so tempted to wear this look out tomorrow! It's crazy bright but it looks amazing - I can't believe how well the colours blend together!
In this look I have used Slowburn, Savage, Jilted, Urban and Chaos. So half the colours in the palette!
I started with ELF cosmetics primer and NYX jumbo eye pencil in Milk as my base and Slowburn on my entire eyelid.
Next I applied Savage into my crease and blended out with Mac's Blanc Type, then darkened my crease using Jilted.
For a finishing touch I applied Aura from UD's Glinda Palette.
To my lashline I applied Chaos very closely to my lashes, to later darken Urban which went over the top, and blended out with blanc type - to create a type of gradient effect.
On my waterline is Rockstar 24/7 pencil from Urban Decay, and to create my wing I applied Perversion liquid liner.
...I think I'm a bit of an Urban Decay Junkie!
Lashes are the Princess Lashes from Born Pretty Store and Urban Decay Supercurl Curling Mascara.
So that's today's look, I hope you like it as much as I do! This is definitely a favourite of mine from recent months looks :)
x

Minggu, 20 April 2014

Urban Decay Electric Palette Look!

Hey guys!
I'm sorry I've been gone for a while, I've had a lot of hours at work lately and it's completely tired me out! I've had this look in my back pocket for a while and I absolutely love it! I needed to put it up asap - I'm just annoyed asap took so long!
Anyway here's the look, a bit picture heavy! I hope you like it :)
As always I started with my Elf primer and NYX jumbo eye pencil in Milk as my base.
To start my look, I applied Thrash over the inner two thirds of my eyelid. I cannot believe how pigmented this shadow was! I was expecting Thrash, Savage and Slowburn to be maybe a bit clear but the colour payoff is insane!
In the outer third and in my crease I applied gonzo which came out a stunning sky blue over NYX JEP in Milk, and sea blue over Thrash. In the very outer crease I use Fringe and a little Chaos.
On my brow bone I blended in Mac's Blanc Type with Gonzo to create a smoother finish and worked both shades of Aura from Urban Decay's The Great and Powerful Oz, Glinda Palette into my inner corner for a little bit of shimmer.
My eyeliner is Urban Decay's Perversion Liquid Liner and Lashes are the Princess Lashes from Born Pretty Store.
Under my lower lashes I applied Slowburn which is a gorgeous, bright shimmery orange shade.
On my waterline is Eyeko Skinner Kohl Liner in a light pink shade which I am loving at the moment. I do love using black eyeliner but it can make your eyes look so much smaller sometimes. The payoff in Eyeko's liners are fantastic and definitely worth the price.
Mascara is Urban Decay's Supercurl Curling Mascara and that's the look done!
I hope you like this look guys, fingers crossed I will have something new for you soon!
x

Selasa, 08 Oktober 2013

Fall / Autumn Inspired EOTD!

Hey guys! Seeming I've not done a lot of makeup looks lately, I thought I better post another! This one was inspired by all the amazing fall pictures I've been seeing on Instagram lately! I love this time of year, and I love autumnal colours, so here's a lil' look I've done, hope you like it!
One of my favourite eyeshadow colours is Maple from Sleek's Ultra Matts V2 which is the main colour for this look. To create the smoky shadow I used Paper Bag and Noir, and Pillow Talk as my highlight shade. The only colour I used which was not from this pallette was Sin from Urban Decay Naked Palette which I've used in my inner eye to brighten the look up a bit!
My lashes once again are Eylure #100's, I love them! I managed to get them from John Lewis for only £4, Bargain! Right I'm going to stop talking now and just add a few more pictures!
I hope you guys like my fall inspired look! I love being able to get away with wearing darker colours! You can never beat a simple smoky eye!
 
x

Minggu, 06 Oktober 2013

Hallowe'en Look! The Evil Queen / Vampire

Hello guys! It's been so long since I've posted a look! I was going to leave it another day as I feel rotten but I couldn't do it! I need to post my first Hallowe'en look! (a little excited...)


So here's the first look for you guys, my version of an Evil Queen / Vampire Queen!
I put a post up a little while back featuring some of the looks I wanted to do for Hallowe'en this year, and this was one of them, however it was my first attempt/trial run! I don't usually do them, but I had some great ideas in my head and I wanted to get them out 'on paper'. I'm useless with drawings and face charts so it's really the only way for me to show what I'm thinking.
In my trial run I used purples instead of reds (only because that's the colour I wore that day!) however blood red was always what I visioned! When else do you get to wear red eyeshadow apart from on Hallowe'en? Lets make the most of it!
I started with my ELF primer (only £1.50 and I love it!) and NYX jumbo eye pencil in Milk all over my eyelids where I knew I was going to apply colour. Then with a No.7 soft kohl eyeliner pencil in Black I followed the bone just above my crease to use this as the outline for my shadows.
Starting with the darkest colour I applied the red eyeshadows (all different shades from NYX, sorry I have no idea on names!) and then added my inner highlight colour which is from my Urban Decay Glinda Palette, called Illusion.
I used a matte white shadow as my brow highlight, from my Sleek Matts V2 palette and then, using a sharp, flat angled brush I used Blackout from Urban Decays Naked 2 palette, and went over the black outline. I LOVE this black! It's so pigmented! I then applied Benefit's They're Real mascara and my favourite Eylure Lashes and we're done! I could've made the overall look bigger, but I like when my eyes are closed you only get a glimpse of the red shadow. I might experiment with this in the future!
I hope you like my look! Please leave a comment below and let me know what you think, I love hearing from you and reply as soon as I can!
If you're going to recreate any of my looks PLEASE link me! I would love to see what people come up with!
Quick Tip: If you are going to try and recreate this look, make sure you use a soft, well sharpened eyeliner pencil! (UD 24/7 pencils are great for this) If its not soft or sharp enough, it will pull your skin and you won't be able to get a sharp line!
 
Hope you like! x

Minggu, 22 September 2013

New Hair! Back to Blonde!

Helloooo! Ok, I've been a bit MIA recently! Where I work, We have just had a refit and I've been working my ass off trying to make up all the hours I've missed whilst we've been closed! Although it closed at a great time, right over the Bestival weekend! WOHOO! I also went and go my hair done! I've been wanting to go back to blonde for a while now and I always said I'd be blonde for our holiday (to Florida in a month!) which I'm really excited about! So, here's my new look!
So here's my new look! I'm still trying to work out what I should do with my eyebrows... They seem a bit dark sometimes so I think I'm going to get a honey colour toner for my hair, and make the blonde colour cooler.
So this was my hair before I got it done. I had to go brown because the blue I had in it before wouldn't budge! It turned my hair a toxic green colour so brunette was my only option! I did love it, may have to go back at some point...
 
STEP ONE
OK it was a lengthy process! Because the roots wouldn't take as long to dye, he started by just applying the peroxide mixture to the hair which had already been dyed.
 
STEP TWO
Next up, he applied the peroxide mixture everywhere and stuck me in the oven haha
 
STEP THREE
Next up, washing my hair and cutting my hair! Whatever colour I had a year ago, didn't want to budge! So the ends were looking a bit orange at this stage! He decided to cut it now to see how much would be taken away, which luckily was quite a lot. I was a tad worried haha
 
STEP FOUR
Next step... applying more chemicals everywhere! Oh My GOD! 45 minutes of this on my head was making me go crazy! It was pretty painful! I was using the metal handle of the comb to itch my scalp with! You can definitely feel it working its magic! Hot, Cold, Bubbling... you name it.
 
STEP FIVE
I've ran out of photos! It was so quick. My hair was washed, and then a toner was used to get the blonde colour I wanted. Then a final cut and blow dry and 4 and a half hours later, we're done! I am so happy with the colouring! I'm going to pick up a toner with honey tones in to just dull it down a bit for winter.
I'm looking forward to doing some bright eye looks with my blonde locks!
Seeming I was at the hairdressers for almost 5 hours, and had at least 4 treatments and a haircut, I couldn't believe it only cost me £80!
 
Let me know what you think! I always love hearing from you, and don't forget to enter my giveaway here!


Senin, 10 Juni 2013

Disney Series: Shere Khan from The Jungle Book!

Hey Guys, Here's another look from my Disney Collection!
I love doing this collection, it's really nice always finding ideas on what to do and getting inspiration. Whenever I go to sit down at my makeup table, if  I don't have a clear picture in my head of what I want to do, It usually goes horribly wrong!

This looked is based off the tiger from The Jungle Book, Shere Khan. I used to love watching this film as a kid but I haven't seen it in years! This was actually the second look I did from the Disney Series but I didn't like it! I've since redone it and simplified, which is sometimes so much more effective than over complicating things


Unless you're going to go OTT there's not a lot you can do with a tiger... haha I didn't want to do too much as I wanted it to be a wearable look, so I've kept it nice and simple and elongated the matte black eyeliner, for a cats eye look.


As always, the majority of the colours came from one of my Sleek palettes! This time the V1 mattes for a change! The first time I used this palette I found the colours quite chalky but that's to be expected from such bright pigment, however it doesn't seem to be the case any more. They blend beautifully and the colours are so vivid and rich! Can't explain how much I love these palettes!


For Shimmer in my inner corner, I added MAC's baby, it's cold outside eyeshadow, which was released within a christmas set last year, and I also used my BeautyUk palette which has some gorgeous burnt orange colours which really came in handy for creating beautiful shape and shadow.

My eyeliner is Collection 2000's waterproof liquid eyeliner and my lashes are called Hearbreaker by LetsGo (I think from the Blink+Go family?) 

And that's pretty much it!
If you used a more coral toned orange and brown eyeliner this would be a lovely summers day look!

Kamis, 06 Juni 2013

Disney Series: Mater from Cars!

Hey guys! Sorry it's been so long since I've posted a makeup look! Life gets hectic sometimes, but I've got a few new looks ready to post in the next few days! And here's the latest! Mater!

This one was requested by my boyfriend! I've made him a little Disney crazy lately, my bad! But I love it! His favourite is Cars so he gave me the idea to do Mater!


Mater is such a cutie pie! This look is much more wearable than the latest few I've done, so it was nice to mix it up a bit! I was a little worried as there isn't a lot of colour going on, but once I saw a few more pictures I realised the last of his teal paintwork, and added a rusty gold to match his sparkly personality!


I even added his little crow bar as my wing! N'awww! Once again, the majority of the colours were from my Sleek V2 Palette, I would be lost without it! The pigment you get from the colours are incredible and the price is fantastic! I can't wait to go and visit my boyfriend so I can get some more palettes! (I can't get them on the Isle of Wight, boo!)

The gold shadow is Half Baked by Urban Decay and the brown eyeliner is from a Beauty UK palette (I also used the burnt red from the palette for a little more rusty depth!)


I cut up an old pair of eyelashes which were from Collection 2000 and just used a few strands on the outer lash line to give little Mater some get up and go! I didn't want to use strip lashes because I think they would have been a bit over powering. For me this is more of a wearable daytime look, and unlike some, I can't stand lashes enough to be able to wear them all throughout the day! That would take a lot of getting used to...


I hope you like my latest look! Sorry the photos aren't great, I did it at the wrong time of day and just couldn't get the light to work with me! Damn nature...

As always, if you have any idea on what Disney Characters I could do next, please let me know!

Hope you're all enjoying the sunshine! x x

Selasa, 05 Februari 2013

Happy Endings...

Hello blogging world! Wow this is weird, I haven't done it in so long! I don't want to bore you with why I haven't blogged in ages but I basically lost all motivation and people brought me down. However, It's a new year and I have beautiful people in my life that make me smile and give me the encouragement I need to pursue my love of makeup! I feel like a very lucky girl!

Seeming I haven't done a makeup look in so long for you guys, I thought I'd start the year with one! I haven't really done them recently because I haven't had a decent camera but my wonderful boyfriend has kindly lent me his! Isn't he a sweetie...


I couldn't be happier with the quality of the pictures! I'm so fussy when it comes to lighting etc that it's nice I can relax so much with a camera! Please Click on the pics for a better look! They look amazing, I hate how they come up so small on here!


I've fallen in love with an OPI nail polish called Rally Pretty Pink, which is a gorgeous pinky, purple shimmer with a golden duo chrome, I would of uploaded a picture of it but it's a bitch to photograph so apologies! Anyway, my look is basically based on that polish, which I thought might be a cool idea for a makeup series? Corresponding makeup to your favourite nail polish... what do you guys think? (that's if anyone reads this! If you're like me, you just look at the pictures!)


The shadows are all a bit of a mix really. I started with Urban Decay PP, NYX jumbo eye pencil in Milk and then patted on the purple shade from the Sleek Idivine Acid palette all over my eyelid and blended it out with MUA's shade 18. To draw attention to the centre of my eye I used Highness from Sleeks Ultra Matts V2 palette in the outer and inner corners of my eye and also lightly in the crease and blended out on my lower lash line. This alone looks amazing, but I love a bit of sparkle so I added UD's Half Baked to the centre of my eyelid and slightly blended it out. To Finish off I used Pillow Talk from Sleek's V2 palette as a brow highlight, UD's Perversion eyeliner pencil and Mac's black lash Push Lash mascara.


I didn't really know what to do with my lips so I went GOLD! I started with Natural Nymph from ELF, then applied a clear lipgloss and patted on Urban Decay's Half Baked eyeshadow. Finally I added Fairy Cake lipgloss from Butter London and lips are done. PS: WEIRD uploading a photo of my lips. I hate them!


And that is that! Look done :) I forgot how much I LOVE playing around with makeup and trying new things! I've recently bought loads from Urban Decay (fallen in love <3 again!) and can't wait to try out the Glinda Palette!

I think I'm gonna do a quick post from my phone at some time, just to show you all the looks I've done and stuck on instagram (soo lazy) because I really loved some of them! But I'm definitely going to start photographing them properly for you guys!

I hope you like it and can't wait to do another look! Please let me know what you think by writing a comment below :)

Love as always! x

Sabtu, 06 Agustus 2011

E.L.F make-up look

I was overly excited this morning when I got my order from E.L.F and had to do a look! I've been playing all day and so far I love pretty much everything!
Not really keen on the lip primer and plumper but I've only used it once so will wait and see if it can change my mind. Also, I know everyone raves about it but so far I haven't seen what was so great with the HD powder. But once again will wait and see, only used it once :)

So, here's my look!

click on pics to enlarge


The only products I used that wasn't E.L.F was my Mac mascara, max factor foundation and The dark green eyeshadow which is MUA.

Out of  everything my favourite buys are probably the mineral infused face primer, all over colour stick in spotlight, powder brush and the contouring blush and bronzing duo. Now I haven't used everything yet so these are my favourites so far! The primer is so thick that you don't even need to use a whole pump of the stuff, it goes a long way and makes your skin really smooth. The colour stick is perfect for highlighting, the brush is incredibly soft and the contouring duo is perfect! The shades are just right for a blush and contour.


For some reason my camera didn't want to pick up the colours of my eyeshadows but it's much greener in real life!

On my eyes I used all the colours from the smokey eyeshadow palette apart from the purple and the waterproof eyeliner pen (which works really well) I also got the bamboo blending eye brush but I'm not overly excited about this. It's very light (bamboo, duh) which makes it a bit harder to use if that makes any sense?! But it also seemed to eat my eyeshadow! I put quite a lot on the brush and got very little off. (This is just first impressions, may completely change my mind later on!)

On my lips I used the primer and plumper, so far not too sure on this... will report back. I also used the lip stain in Fashionista. The colour is beautiful but I ate my dinner and poof, it had all vanished. Being a lip stain I thought it might hold a bit better but no such luck, however I did put primer and plumper on first so maybe that didn't help! Will try it again without.

Overall I am thrilled with my purchases from E.L.F and I cannot wait to get some more things! I've already started up a wishlist and will definitely be getting my friends presents from here in the future!

I hope you like the look and just because I have to, here's my stupid face. Peace x


Lush Oxford Street! Haul and Make-up Review

Hey guys! Yesterday I got to go to the brand new Lush store on Oxford Street! It was absolutely amazing! They opened the doors a day early f...